AI Assistant
MAGDA includes a built-in AI chat assistant that lets you control the DAW using natural language, and a DSL console for direct scripting.
Overview
The AI Assistant panel is located in the left panel. It has two tabs at the bottom: AI for natural-language interaction and DSL for direct script execution.
AI Tab
Type a request in natural language and the assistant translates it into actions:
- "Add a MIDI track with a bass clip"
- "Transpose the selected notes up an octave"
- "Set the tempo to 120 BPM"
- "Mute tracks 3 and 4"
The assistant is context-aware — it knows which tracks, clips, and devices exist in your project and what is currently selected.
Selection Context
At the bottom of the AI panel, a context indicator shows the currently-selected track, clip, or device.
- When the indicator is on (orange accent colour), the AI treats your selection as the default target. A request like "add a bassline" with a track selected will target that track instead of creating a new one.
- Click the indicator to toggle it off. The selection is no longer sent to the LLM, and requests are interpreted without a default target.
Creating a new track still works either way — just be explicit in the request ("new track", "another track") when the indicator is on.
How It Works
- You type a natural-language request in the chat
- The assistant translates your request into MAGDA's internal DSL (domain-specific language)
- The DSL commands are executed as actions in the project
- The assistant confirms what was done
Setup
The AI Assistant supports both cloud LLM providers and a fully offline local model. Configure them in the AI Settings dialog (Settings > AI Settings); see AI Settings for the Cloud, Local, and Config tabs.
Usage Tips
- Be specific: "Add a reverb to Track 2" works better than "make it sound spacey"
- The assistant can handle multi-step requests: "Create 4 MIDI tracks and name them Kick, Snare, HiHat, Bass"
- Use it for repetitive tasks: "Set all tracks to -6 dB"
- Prefix a message with
/dslto execute DSL directly from the AI chat without making an AI call
Drummer Agent
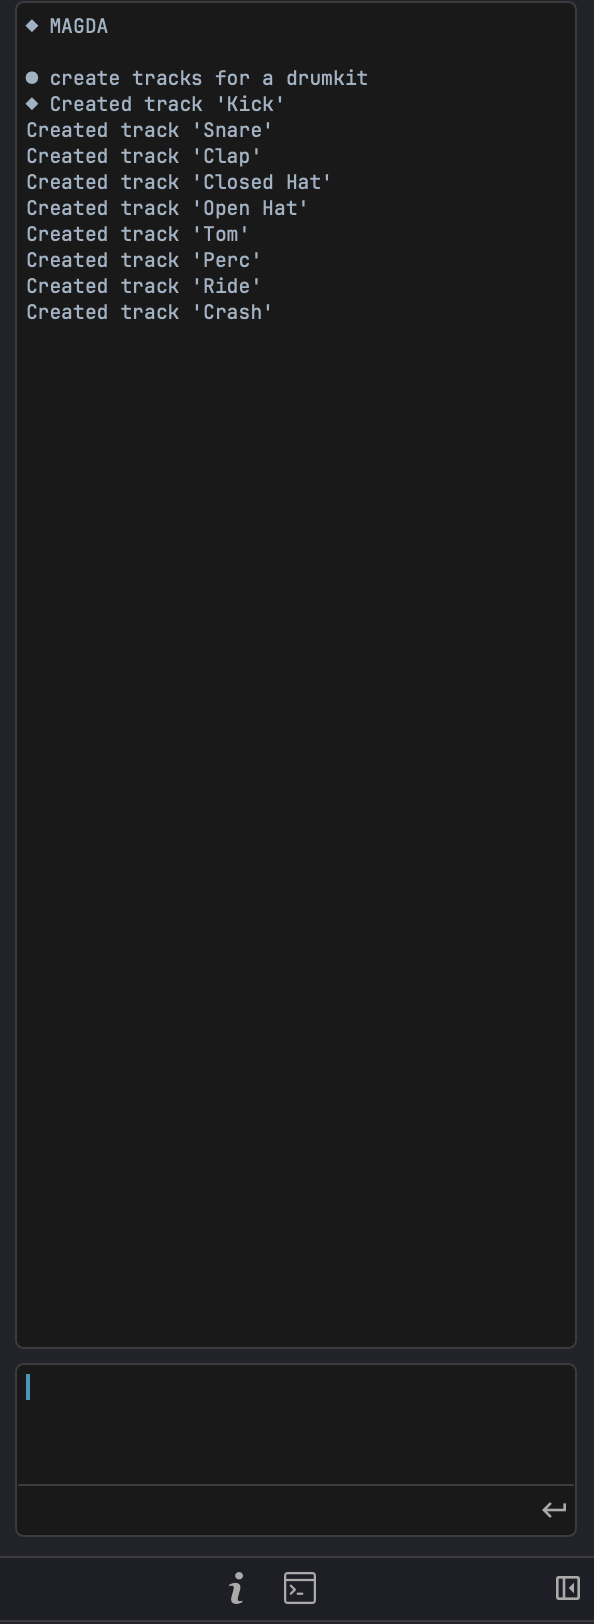
When you select a track that hosts a Drum Grid (or a MIDI clip on one), the AI chat automatically switches into Drummer mode. The input area shows a drum icon and a Drummer - <track name> breadcrumb, and your requests are routed to a specialised agent that writes drum patterns instead of the general DAW assistant.
In this mode, describe the groove you want in plain language:
- "four on the floor with offbeat open hats"
- "a half-time hip-hop beat, snare on 3"
- "busier hats in the second bar"
The agent works in terms of drum roles (kick, snare, closed hat, and so on), so it places hits on the pads you have labelled with matching roles. If a Drum Grid clip is selected, its current pattern is sent along as context, so follow-up requests like "add a crash on the downbeat" build on what is already there. The generated pattern is written straight into the selected clip.
Drummer mode is automatic and context-driven; there is no slash command to type. Select a non-drum track to return to the general assistant.
View Context
The console follows the view you are working in. The context label above the input box shows where your requests are routed:
- Arrangement view — requests go through the general assistant, which picks the right specialised agent for the task.
- Session view — requests are scoped to session workflows (scenes, clip slots, launching).
- Mixer and master views — requests are routed to the mixing agent.
Each view keeps its own conversation, so switching between Arrangement, Session, and Mixer picks up the thread you left in that view rather than mixing them together.
Mixing Agent
In the mixer view, the console talks to a specialised mixing agent. It can read the per-track measurement layer — loudness, peaks, stereo width and correlation, and detected frequency collisions between tracks — and ground its feedback in those numbers.
Run an analysis from the mixer's Analyze button first; a mix analysis ready chip appears next to the console input once results exist. Then ask things like:
- "what is fighting with the bass?"
- "is the master loud enough for streaming?"
- "which tracks are mono-incompatible?"
The agent reads the measured findings rather than guessing from track names, and can suggest concrete moves (level trims, EQ areas to look at) based on them.
DSL Tab
The DSL tab provides a code editor with syntax highlighting for the MAGDA DSL. It's designed for users who want to script DAW operations directly without going through the AI.
Editor Features
- Syntax highlighting — keywords (blue), methods (yellow), parameters (light blue), strings (orange), numbers (green), note names (teal), comments (green)
- Direct execution — commands run immediately against the DAW with no network calls
- Command history — results appear in the output area above the editor
- Keyboard shortcuts:
| Shortcut | Action |
|---|---|
| Cmd+Enter (Mac) / Ctrl+Enter (Win) | Execute code |
| Cmd+L (Mac) / Ctrl+L (Win) | Clear output |
Quick Start
Switch to the DSL tab, type a command, and press Cmd+Enter:
track(name="Bass", new=true).clip.new(bar=1, length_bars=4)
Type help and execute to see available commands.
DSL Quick Reference
A few common commands to get started. For the full language reference, see DSL Reference.
track(name="Bass", new=true).clip.new(bar=1, length_bars=4)
.notes.add_chord(root=C4, quality=major, beat=0, length=4)
.notes.add(pitch=E2, beat=0, length=1, velocity=100)
track(name="Bass").fx.add(name="compressor")
track(name="Bass").track.set(volume_db=-6)
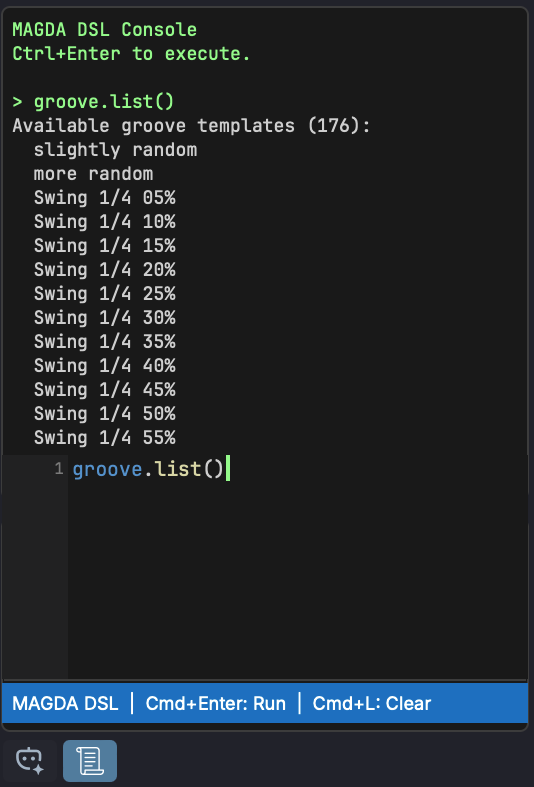
groove.set(template="Basic 8th Swing", strength=0.5)
Slash Commands
Prefix your message with a slash command to constrain the AI to a specific domain:
| Command | Description |
|---|---|
/groove <request> |
Create or apply swing/groove timing templates |
/design <description> |
Generate a 4OSC preset from a natural-language description and apply it to the focused 4OSC device |
/theme <description> |
Generate a UI colour theme from a natural-language description and apply it live |
Typing / shows an autocomplete popup with available commands.
/theme - AI Theme Generator
Type /theme <description> to design a MAGDA colour theme from words - for example warm sunset, dark, cold arctic blue, retro amber terminal, or cyberpunk neon on black. The assistant produces a full palette, saves it as an editable JSON file in Documents/MAGDA/Themes, selects it, and applies it live.
The theme stays selected afterwards. Edit its .json on disk to tweak it - changes re-apply instantly - or switch themes at any time under Preferences > Appearance. See Preferences - Theme for the theme file format and the manual load/template buttons.
Which model powers /theme is set by the Theme agent role in AI Settings > Config (Advanced mode).
/design — AI Sound Design
Select a 4OSC device, then type /design <description>. The assistant produces a preset (waves, filter type, voice mode, FX gates, ADSR, levels) and applies it directly to the focused device.
The chat shows a categorised summary of what changed, plus a one-line apply status. The preset name and category the AI chose become the default values when you save the preset from the device header — just click save and hit Enter.
Built-in safeguards:
- A master-level safety cap estimates worst-case peak gain from the active oscillator count, distortion drive, and filter resonance, then clamps the master
levelto keep peaks in a sensible range. The AI's choices are only overridden when they would clip. - The result is a starting point, not a final preset. Tweak by ear before saving.
For example prompts and recipes, see the 4OSC Synth — AI Sound Design section.
Per-Device AI Panel
Sound-design generation is also available without leaving the device chain. Every device slot exposes an AI icon in its header — click it to open a docked panel attached to that device.
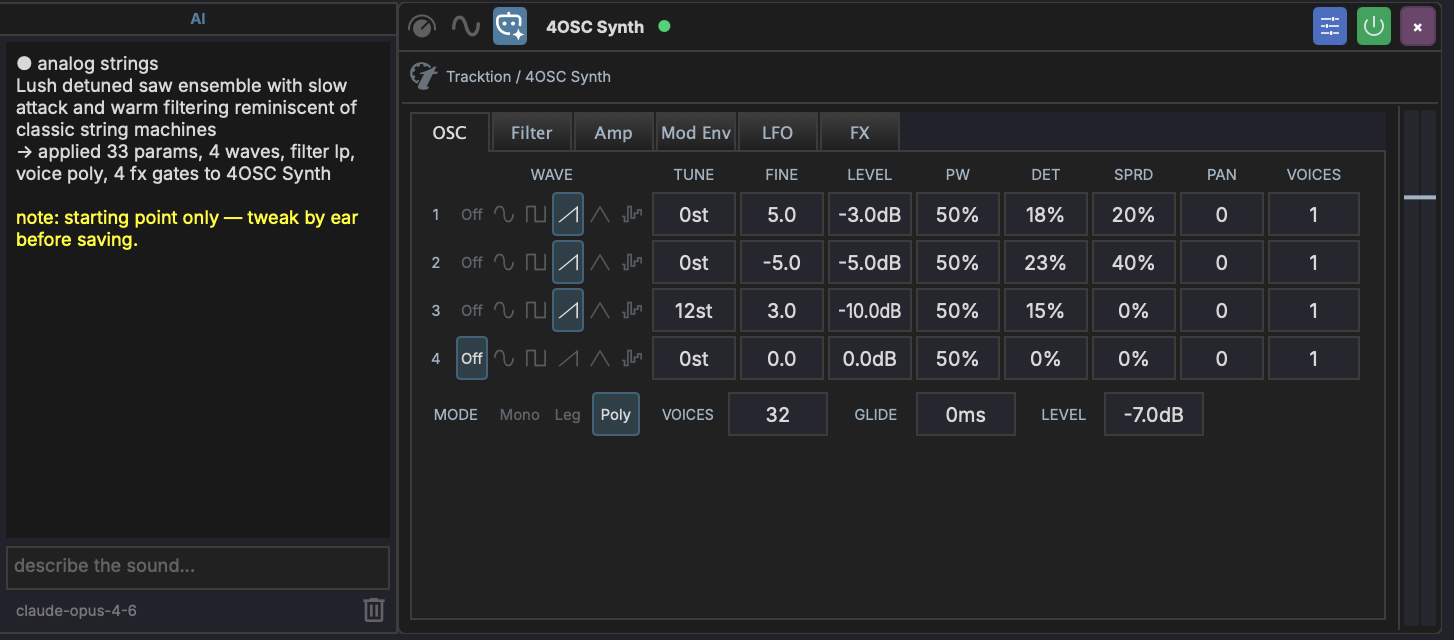
The panel has three rows:
- Output area — streams the model's response token-by-token, then appends a one-line apply status (
→ applied N params, M waves, …). The history persists across slot rebuilds (preset loads, plugin reloads, sidechain edits) — your last result stays put until you clear it. - Prompt input — type a description and press Enter to submit. Submitting cancels any in-flight generation on the same device.
- Footer — shows the active model id on the left and a delete button on the right. The delete button clears the chat for that device only.
Generations are scoped to the device the panel is mounted on. Devices without a sound-design agent (everything except 4OSC at the moment) show AI design not supported for this device in place of the prompt placeholder.
This is the same engine as the chat-based /design command — same agent, same safeguards, same preset name/category propagation to the save dialog. The panel is just a more direct path: focus the synth, prompt it, hear it.
Param Aliases (@)
The AI chat understands @aliases as a shorthand for paths. Type @ in the chat input to open an autocomplete list of available aliases — focused track, focused device, named macros, named modulators. Picking one expands to the full path the AI agent resolves.
Useful for tying a request to a specific scope without spelling the path out:
@focused.macro = 0.7
modulate @focused.cutoff with a slow LFO
Aliases are resolved server-side to the same ChainNodePath the DSL uses, so any command that takes a path takes an alias.